
Ah, vegetables.
We have a few beloved salad recipes that are included my big recipe round-up, and our salsa recipe is a favorite. Cute W has been obsessed with making pico de gallo ever since we adopted this vegetarian meal. And I have some super-easy vegetable sides that I’ll whip up quickly to make sure that there are enough vegetables with dinner: spinach, broccoli, or French beans steamed, often with lemon butter or tons of garlic. We also roast vegetables like crazy: onions, carrots, zucchini, butternut squash, broccoli, cauliflower, garlic, asparagus, kale, and others. The girls would be happy to eat just that for a meal, while Cute W and I find a big bowl of roasted vegetables just a tad too healthful to be satisfying entirely. And if you are looking to get kids to eat vegetables and/or grow up to be kids who are more excited about vegetables than you are, I’ve shared plenty of tips for littler ones in articles like 10 Ways to Get Your Kids to Eat Vegetables and Vegetables A to Z.
So, yes, I’ve talked about veggies plenty, but lately I’ve got a few recipes that I simply must share. They are too delicious not to offer up to you.
Mexican Street Corn
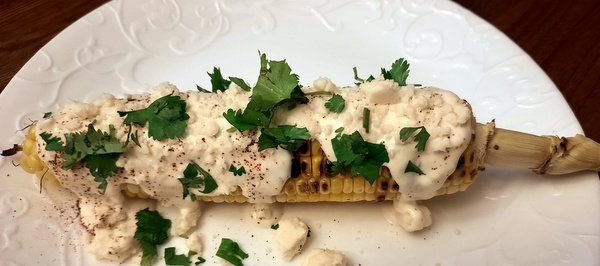
I had tried a recipe for Mexican street corn years ago and the results were unimpressive. Last summer, though, I hit on a recipe that blew us away. I think my original sources were this Food with Feeling one or this Serious Eats one. This corn became a serve-it-to-your-guests-and-they-will-all-ask-for-the-recipe, isn’t-the-main-dish-but-feels-like-it-should-be kind of recipe. We are very excited that it will soon be corn season again.
Mexican Street Corn
Combine for white sauce (this is good for c. 6 cobs):
- 1/2 cup Mexican crema (or substitute sour cream- I buy crema at La Mexicana and I do think it’s better for this)
- 1/2 cup mayonnaise
- 1 clove garlic, minced
- ¼ teaspoon ground chipotle pepper and/or cayenne pepper
- 1 teaspoon finely grated lime zest
- 2 tablespoons lime juice
Also prepare for serving:
- 1/2 cup chopped cilantro
- 1/2 cup cotija cheese, crumbled (or substitute Parmesan or feta, but it’s pretty easy to find cotija cheese. If you’re new to Mexican cheeses, cotija is better for crumbling and Oaxaca is better for melting — they look the same in the package, but they feel & taste different))
- Lime wedges
- Chipotle chili powder or cayenne pepper
And then:
- Shuck corn. I like to leave the end if possible as a handle, because this corn is messy eating.
- Heat the grill to c. 400 degrees/medium high. I like to coat a bit of olive oil directly on the grill rather than oiling or spraying the corn.
- Cook shucked cobs for 12 to 15 minutes, turning every 4 minutes or so to get plenty of pretty grill marks.
- Add a healthy dollop of the white sauce, a squeeze of lime if you’d like, and sprinkles of cheese, cilantro, and spice to taste.
This is so good. I think it’s nice to let each person adorn their own corn cob to their tastes, which makes it almost a mini craft project before you eat it!
J’s carrots
I am actually very fussy about carrots — in fact, I barely ever ate them until I became an adult. I really don’t like raw carrots at all, and I’ll only tolerate uncooked carrots if they’re finely grated so that they can blend in with a salad or sandwich. But these days, I love me some cooked carrots. The first carrot dish that began my Journey To Carrot Appreciation was something my Dad made — cut carrots into coins, boil them until they’re tender, then saute them with some butter and sugar. This effectively turned the carrotiness of the carrots into a bit player beside the buttery sweetness, which worked for me. I still think they’re delicious and an excellent comfort food, especially net to some mashed potatoes. But J’s Carrots are my new favorite, and they really embrace their carroty essence.
I said that we roast a lot of vegetables, but I don’t put tons of thought into my roasting. Cut ’em up, a little olive oil and some salt and pepper, and cook them into a super hot oven (400 to 450 degrees) ’til they seem done. Fortunately, roasting makes pretty much everything more delicious, and it’s super-easy and a great way to use up random leftover vegetables or “stone soup” your way into a vegetable side with the kind of random stuff that doesn’t spoil quickly and thus is likely to be found in the recesses of your pantry or fridge (I’m looking at you, carrots, onions, and potatoes!).
With J’s roasted veggies, I pay a bit more attention and care, and it’s worth it. This recipe and the one below are recipes that J found (probably on TikTok, which I’m not even on) and then tweaked, so I really can’t offer up proper attribution, except to assure you that they’re not mine.
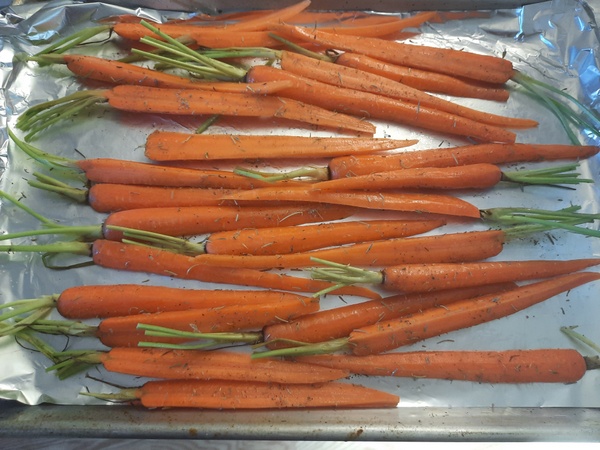
J’s Carrots
Preparing the Carrots:
- Preheat the oven to 425 degrees.
- Use either thin carrots left whole or thick carrots cut 1 or 2 times lengthwise. We leave on some of the greens purely for style, but we usually end up eating them, too
- Add enough olive oil to lightly coat the carrots. I honestly find it easiest and fastest to drizzle on a tablespoon or two and then toss the carrots around in my hands even though it makes my hands oily. It’s moisturizer!
- Add, to taste:
- salt
- pepper
- thyme
- sage
- rosemary ~ I don’t add tons of any of this because of course the carrots shrink as they cook, so the seasonings will be denser at the end. The image on the right is carrots about to go into the oven.
- Put the carrots in and set the timer for 12 minutes, then turn the pan and toss them around a bit before setting the timer for another 12 minutes. Depending on the width of your carrot, you might do more or less, and sometimes we’ll pull the littlest carrots out early while the thicker ones keep cooking.

While the carrots cook, you prepare the dip, which starts with the chili oil that you see in that left image.
I was preparing this chili oil myself and I got a little frustrated because J had offered up a rather vague recipe, and when I asked for more specifics and direction, she said things like, “Taste it and listen to your heart, Mom.” And I said, “I don’t want to do what ‘my heart’ tells me, I want to make it like you do!” But she was busy with homework, so I followed the recipe that she’d written down, and then, later, she asked questions like, “Did you add red pepper flakes?” and I said, “No, because red pepper flakes weren’t in the recipe!” and so she tinkered some more and I took notes. The recipe is still somewhat vague, and I’m sorry. All I can say is, listen to your heart.
Chili Oil
- Put olive oil in a small pan over medium heat and add the following:
- paprika
- chipotle chili pepper
- chili powder
- red pepper flakes
- Optional – fresh minced onion
- Once the oil becomes fragrant, remove the oil from heat and add:
- a lot of minced dried onion
- some powdered garlic
The Dip
- Combine:
- Goat cheese
- Honey
- Chili oil
- Mix and adjust ratios to your taste.
So, that image above and to the left is my chili-oil-in-progress. You’ll see that just behind the pan is a canning jar that is filled with pureed whole chipotle peppers. I don’t know if you ever buy the canned whole chipotle peppers, but they are very spicy and smoky and tasty, and we usually don’t use more than a couple of tablespoons out of a can, and the cans are usually a cup or a cup and a half. So then we’d have a slightly grimy-looking can in the refrigerator. Then we finally got smart (actually, it was J’s idea) and I just pureed the full can at once and re-homed it, and now it’s much more convenient to just throw into dishes, which is good because it’s yummy. If you like to throw hot sauce on stuff, I highly recommended doing this. Although I think at the time, for this recipe, she was like, “Um, I don’t use that — I use the dry spice stuff for this recipe.”
Anyway, this dip is not the most beautiful presentation, but the carrots are cute and I swear that together, this is super, super, delicious. Like, so good that last time I made a batch I immediately started prepping more carrots because I knew we were going to run out and be sad.

J’s Portabella Mushrooms
J found this as a recommended meat substitute, and I think it could, in fact, be a great item to serve if you wanted to let folks make their own sandwiches while offering something a little more substantial for vegetarians than the usual hummus (although I love grilled zucchini and onions for that purpose, too). The original recipe J used recommended peeling the mushrooms, but I am lazy and I don’t like to waste food, so I immediately taste-tested and couldn’t tell the difference. Perhaps your palate is way more discerning than mine, but keep in mind that it’s getting knocked out by some spices, too, so I think it would be a challenge to really tell the difference.
Ingredients:
- Three portabella mushrooms
- 1 T pureed chipotle in adobo (look! my jar’s coming in handy!)
- 3 T olive oil
- 1 t garlic powder
- ½ t salt
- 1 t paprika
To Make It:
- Preheat oven to 450 degrees
- Cut mushrooms into 1/3 inch strips
- Combine all other ingredients
- Brush mushrooms with the spicy oil mixture
- Bake mushrooms for 15 minutes at 450 degrees
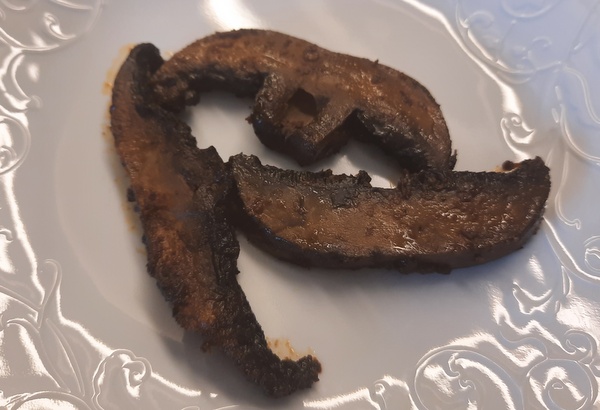
You can just eat these as a side dish, make them the heart of a sandwich, or I bet you could chop them up and throw them into a salad or a bowl — they’re super-flavorful.
And, finally, after all of that vegetable talk, does anyone remember me talking about getting peaches from The Peach Truck last year? Now’s the time to order if you’d like your own this summer!
Nana in Savannah
This made me hungry and made me smile!
love,
mom